Pages

Subscribe:

Ads 468x60px

Tuesday, December 23, 2014

Adding a custom proxy path for WSO2 Carbon 4.3.0 Based Products

The objective of this article is to give a comprehensive guide on, custom proxy paths, why we need a custom proxy path and how to enable a custom proxy path for WSO2 products. This feature was introduced in Carbon 4.3.0 release.

Custom proxy paths

Custom proxy path is used when mapping a proxy url pattern into a back-end url pattern.
For example lets consider

Proxy entry url path :             https://wso2.com/ProxyContextPath/products
Back-end service url path :         https://wso2.com/products

In the above example “ProxyContextPath” is the proxy context that was added for the target service url. When a client sends a request to the proxy entry url path, the request has to be directed to the back-end service url where the original service lies; and finally the client has to be served via the requested proxy entry url path. The mapping between the proxy url path and the back-end service url path can be resolved fronting the service to a reverse proxy server.

Why we need a custom proxy path?

In the current WSO2 server implementations web context root can be used to change the context root of the management console. The limitation of using the web context root is that it can't be used to change the context root of services.

Proxy context path is a useful parameter to add a proxy path when a Carbon server is fronted by reverse proxy. In addition to the proxy host and proxy port this parameter allows you add a path component to external URLs. e.g.
        URL of the Carbon server -> https://10.100.1.1:9443/carbon
        URL of the reverse proxy -> https://prod.abc.com/appserver/carbon

This specially required whenever you are generating URLs to displace in     Carbon UI components. When hosting multiple wso2 products under the same domain name, the normal scenario is to host them under sub domains.

For e.g. If we have API Manager, ESB and Application Server, the urls would be

https://apim.wso2test.com
https://esb.wso2test.com
https://as.wso2test.com

Also this feature would enable customers to expose several WSO2 products under the same domain name. Following diagram describes this concept.

All the products are under a single domain https://wso2test.com and in the example the products lies on proxy paths

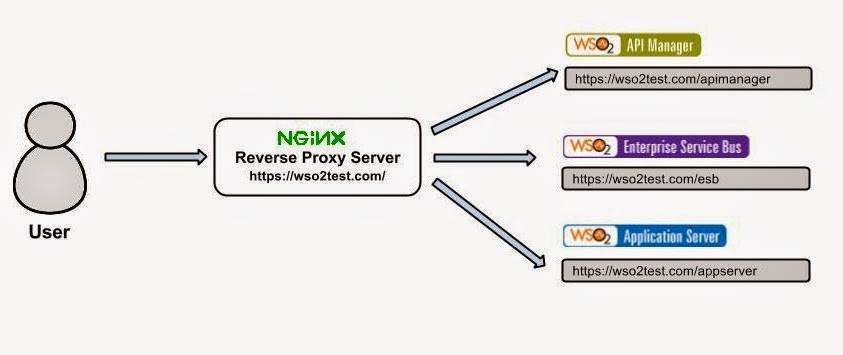
API Manager           ---->      https://wso2test.com/apimanager
Enterprise Service Bus ---->  https://wso2test.com/esb
Application Server       ---->  https://wso2test.com/appserver

Configure WSO2 Application Server to add a proxy context path


In this article adding and configuring proxy context path for WSO2 Application Server 5.2.1 is discussed. Before configuring the Application Server, a reverse proxy server need to be installed and configured. For this article we are going to use the nginx reverse proxy server[1].

First install the nginx server and configured in your deployment server machine.

sudo apt-get install nginx

Then create a folder called ssl inside /etc/nginx and lets create the ssl certificates inside this folder.

sudo mkdir /etc/nginx/ssl
cd /etc/nginx/ssl

Then create the server key and certificates.

First create the private key. A pass phrase is prompt when creating the private key.

sudo openssl genrsa -des3 -out server.key 1024

Next create the certificate signing request

sudo openssl req -new -key server.key -out server.csr

Fill in the required details. Most important entry is the Common Name. Enter the domain name or the ip address if there is no domain name.

Next step is to sign the SSL certificate created. Use the following command to sign.

sudo openssl x509 -req -days 365 -in server.csr -signkey server.key -out server.crt

Now creating the certificate is completed and the last step is to setup the virtual host to display the new certificate.

Create a copy of the default sites-enabled configuration

sudo cp /etc/nginx/sites-available/default /etc/nginx/sites-available/wso2

Now create a symbolic between the sites-enabled directory and sites-available directory.

sudo ln -s /etc/nginx/sites-available/wso2 /etc/nginx/sites-enabled/wso2

Now the host is activated, and open up the /etc/nginx/sites-enabled/wso2 and enter the following configurations.

server {
listen 8243;
    server_name wso2test.com;
    client_max_body_size 100M;

    root /usr/share/nginx/www;
    index index.html index.htm;

    ssl on;
    ssl_certificate /etc/nginx/ssl/server.crt;
    ssl_certificate_key /etc/nginx/ssl/server.key;

    location /appserver/ {
        proxy_pass https://as.wso2test.com:9443/;
    proxy_redirect https://as.wso2test.com:8243/ https://wso2test.com:8243/appserver/;
    }

}

server{
    listen 8280;
    server_name wso2test.com;
    client_max_body_size 100M;

    root /usr/share/nginx/www;
    index index.html index.htm;


    location /appserver/ {
        proxy_pass http://as.wso2test.com:9763/;
        proxy_redirect http://as.wso2test.com:8280/ http://wso2test.com:8280/appserver/;
    }
}

In the nginx configuration for https requests with the /appserver/* pattern, the requests are directed to the /* pattern and the when the service is served to the client it resolves the url pattern to /appserver/*. This is same for the http requests also.

Save the file and Restart the nginx server using the following command and that's done with the nginx configurations.

    sudo service nginx restart

In the configuration https , http requests are listening on the 8243 and 8280 respectively. Server Name is set to wso2test.com. To test in a local machine you need to put the wso2test.com , as.wso2.com into the /etc/hosts entry as follows.

    127.0.0.1        wso2test.com   
    127.0.0.1        as.wso2test.com

Then lets configure the WSO2 Application Server 5.2.1. First Download the product and extract it to your machine. Lets consider WSO2AS-Home as the extracted directory.

Open the /repository/conf/carbon.xml and do the following configuration changes.

Set HostName as the hostname defined in the nginx configuration.

    wso2test.com

Set the MgtHostName as as.wso2.com

    as.wso2test.com

Set the ProxyContextPath as the appserver. This is the proxy path string which will appear in the management console, web apps and services urls.

    appserver

As mentioned in nginx configuration section the https, http requests are listening on the 8243 and 8280; but by default WSO2 products are listening on the 9443 and 9763. In this particular article 8243 and 8280 configured as the proxy ports. Whenever the incoming requests are coming through the 8243 and 8240 they are proxied to the 9443 and 9763 ports.

To enable proxy ports open the /repository/conf/tomcat/catalina-server.xml file and add the following two entries.


proxyport.png 

proxyPort Configuration in catalina-server.xml file

That's all for the configuration. Now start the server and enter the following url in a browser.

https://wso2test.com:8243/appserver/carbon/

You'll redirect to the login page, give the admin credentials and log into the server. You'll find the proxy path for admin console, services, webapps changed to the “/appserver” proxy path.


console.png 

Conclusion


Proxy context path is useful when a wso2 server fronted by a reverse proxy server. You can add a proxy context path along with a proxy host and a proxy port parameter. This enables UI url paths to be display in a proxy path and by enabling this proxy path, multiple products can live under a single hostname.


References


[1].http://nginx.org/
[2].https://www.digitalocean.com/community/tutorials/how-to-create-a-ssl-certificate-on-nginx-for-ubuntu-12-04

Monday, December 22, 2014

WSO2 Carbon 4.3.0 Released..!!!

Hi Folks,

WSO2 Carbon team is pleased announce the release of the Carbon Kernel 4.3.0.

What is WSO2 Carbon

WSO2 Carbon redefines middleware by providing an integrated and componentized middleware platform that adapts to the specific needs of any enterprise IT project - on premise or in the cloud. 100% open source and standards-based, WSO2 Carbon enables developers to rapidly orchestrate business processes, compose applications and develop services using WSO2 Developer Studio and a broad range of business and technical services that integrate with legacy, packaged and SaaS applications.

WSO2 Carbon kernel, the lean, modular, OSGi-based platform, is the base of the WSO2 Carbon platform. It is a composable server architecture which inherits modularity and dynamism from OSGi framework. WSO2 Carbon kernel can be considered as a framework for server development. All the WSO2 products are composed as a collection reusable components running on this kernel. These products/components inherits all the core services provided by Carbon kernel such as Registry/repository, User management, Transports, Caching, Clustering, Logging, Deployment related features.

You can download the released distribution from the product home page : http://wso2.com/products/carbon/

How to Contribute 

What's New In This Release
  • Simplified logging story with pluggable log provider support.
  • Upgraded versions of Hazelcast, Log4j, BouncyCastle.
  • Improved Composite application support.

Key Features
  • Composable Server Architecture - Provides a modular, light-weight, OSGi-based server development framework.
  • Carbon Application(CApp) deployment support.
  • Multi-Profile Support for Carbon Platform - This enable a single product to run on multiple modes/profiles.
  • Carbon + Tomcat JNDI Context - Provide ability to access both carbon level and tomcat level JNDI resources to applications using a single JNDI context.
  • Distributed Caching and Clustering functionality - Carbon kernel provides a distributed cache and clustering implementation which is based on Hazelcast- a group communication framework
  • Pluggable Transports Framework - This is based on Axis2 transports module.
  • Registry/Repository API- Provide core registry/repository API for component developers.
  • User Management API  - Provides a basic user management API for component developers.
  • Logging - Carbon kernel supports both Java logging as well as Log4j. Logs from both these sources will be aggregated to a single output
  • Pluggable artifact deployer framework - Kernel can be extended to deploy any kind of artifacts such as Web services, Web apps, Business processes, Proxy services, User stores etc.
  • Deployment Synchronization - Provides synchronization of deployed artifacts across a product cluster.
  • Ghost Deployment - Provides a lazy loading mechanism for deployed artifacts

  • Multi-tenancy support - The roots of the multi-tenancy in Carbon platform lies in the Carbon kernel. This feature includes tenant level isolation as well as lazy loading of tenants.


  • Fixed Issues

    Known Issues

    Contact Us

    WSO2 Carbon developers can be contacted via the mailing lists:

    Reporting Issues
    You can use the Carbon JIRA issue tracker to report issues, enhancements and feature requests for WSO2 Carbon.

    Thank for you interest in WSO2 Carbon Kernel.

    --The WSO2 Carbon Team--

    Thursday, December 18, 2014

    Extending SCIM User Schema Of WSO2 Identity Server

    In this post we are going to extend the SCIM User Schema Of WSO2 Identity Server and add custom fields.
    More details about Extending SCIM User Schema Of WSO2 Identity Server and SCIM User Provisioning With WSO2 Identity Server using these links. [1], [2]. In this sample we are going to add a custom field called dateOfBirth to the schema. Follow the following steps to enable the custom field.
     
    1. Enable User Schema Extension by setting the user-schema-extension-enabled value true in /repositiry/conf/provisioning-config.xml
    2. Set your Custom User Schema as follows in the /repository/conf/scim-schema-extension.config
    =================================================================================
    [
    {
    "attributeURI":"urn:scim:schemas:extension:wso2:1.0:wso2Extension.dateOfBirth",
    "attributeName":"dateOfBirth",
    "dataType":"string",
    "multiValued":"false",
    "multiValuedAttributeChildName":"null",
    "description":"Date of Birth",
    "schemaURI":"urn:scim:schemas:extension:wso2:1.0",
    "readOnly":"true",
    "required":"true",
    "caseExact":"true",
    "subAttributes":"null"
    },
    {
    "attributeURI":"urn:scim:schemas:extension:wso2:1.0",
    "attributeName":"wso2Extension",
    "dataType":"null",
    "multiValued":"false",
    "multiValuedAttributeChildName":"null",
    "description":"SCIM wso2 User Schema Extension",
    "schemaURI":"urn:scim:schemas:extension:wso2:1.0",
    "readOnly":"false",
    "required":"false",
    "caseExact":"false",
    "subAttributes":"dateOfBirth"
    }
    ]
    ==================================================================================

    3. Start the server and login to the management console.
    4. Go to
    Home     > Configure     > Claim Management > urn:scim:schemas:core:1.0 > Add New Claim Mapping

    File in the Followings
    Display Name - dateOfBirth
    Description- Date of Birth
    Claim Uri - urn:scim:schemas:extension:wso2:1.0:wso2Extension.dateOfBirth
    Mapped Attribute (s) - nickName

    Here we have mapped to the nickName which is already available.

    5. Now you are done with the configurations.

    Now execute the following curl commands to add and get the user.

    Adding a user
    curl -v -k --user admin:admin --data "{"schemas":[],"wso2Extension":{"dateOfBirth":"1987-12-12"},"name":{"familyName":"gunasinghe","givenName":"hasinitg"},"userName":"hasinitg","password":"hasinitg","emails":[{"primary":true,"value":"hasini_home.com","type":"home"},{"value":"hasini_work.com","type":"work"}]}" --header "Content-Type:application/json" https://localhost:9443/wso2/scim/Users
    

    Getting a user using the following command
    curl -v -k --user admin:admin https://localhost:9443/wso2/scim/Users/[User ID Value]
    

    Will result the following.

    {"id":"92851fef-31a8-4c54-b631-616e58a85cc8","wso2Extension":{"dateOfBirth":"1987-12-12"},"schemas":["urn:scim:schemas:core:1.0","urn:scim:schemas:extension:wso2:1.0"],"nickName":"2012-12-12","name":{"familyName":"gunasinghe","givenName":"hasinitg"},"userName":"hasinitg","emails":[{"value":"hasini_work.com","type":"work"},{"value":"hasini_home.com","type":"home"}],"meta":{"lastModified":"2014-12-02T15:29:27","created":"2014-12-02T15:29:27","location":"https://localhost:9443/wso2/scim/Users/92851fef-31a8-4c54-b631-616e58a85cc8"}}


    [1]. http://sureshatt.blogspot.com/2013/06/scim-user-provisioning-with-wso2.html
    [2]. http://sureshatt.blogspot.com/2013/07/extending-scim-user-schema-of-wso2.html