Pages

Subscribe:

Ads 468x60px

Showing posts with label carbon. Show all posts

Thursday, March 17, 2016

How to Enable Asynchronous Logging with C5

In this post we are going to explore on how to enable asynchronous logging on C5 based servers. More on asynchronous logging can be found here.

1. Copy the disrupter dependency to the /osgi/plugins folder. You can get the disrupter OSGi bundle from here.
2. Edit launch.properties the /bin/bootstrap/org.wso2.carbon.launcher-5.1.0.jar and add the disrupter jar to the initial bundles list.
carbon.initial.osgi.bundles=\
  file\:plugins/org.eclipse.osgi.services_3.4.0.v20140312-2051.jar@1\:true,\
  file\:plugins/disruptor-3.2.0.jar@2\:true,\
  file\:plugins/org.ops4j.pax.logging.pax-logging-api_1.8.4.jar@2\:true,\
  file\:plugins/org.ops4j.pax.logging.pax-logging-log4j2_1.8.4.jar@2\:true,\
  file\:plugins/org.eclipse.equinox.simpleconfigurator_1.1.0.v20131217-1203.jar@3\:true

3. Set the org.ops4j.pax.logging.log4j2.async to true in the pax logging parameters.

4. Add the async loggers to the log4j2.xml file

<?xml version="1.0" encoding="UTF-8"?>
<!--
 Copyright (c) 2015, WSO2 Inc. (http://www.wso2.org) All Rights Reserved.

 Licensed under the Apache License, Version 2.0 (the "License");
 you may not use this file except in compliance with the License.
 You may obtain a copy of the License at

 http://www.apache.org/licenses/LICENSE-2.0

 Unless required by applicable law or agreed to in writing, software
 distributed under the License is distributed on an "AS IS" BASIS,
 WITHOUT WARRANTIES OR CONDITIONS OF ANY KIND, either express or implied.
 See the License for the specific language governing permissions and
 limitations under the License.
-->

<Configuration>
    <Appenders>
 <RandomAccessFile name="RandomAccessFile" fileName="${sys:carbon.home}/logs/carbon.log" immediateFlush="false" append="false">
        <PatternLayout>
          <Pattern>[%d] %5p {%c} - %m%ex%n</Pattern>
        </PatternLayout>
     </RandomAccessFile>
        <Console name="CARBON_CONSOLE" target="SYSTEM_OUT">
            <PatternLayout pattern="[%d] %5p {%c} - %m%ex%n"/>
        </Console>
        
    </Appenders>
    <Loggers>

 <AsyncLogger name="com.foo.Bar" level="trace" includeLocation="true">
      <AppenderRef ref="RandomAccessFile"/>
    </AsyncLogger>

        <Root level="debug">
     <AppenderRef ref="RandomAccessFile"/>
            <AppenderRef ref="CARBON_CONSOLE"/>
        </Root>
    </Loggers>
</Configuration>

That's it now you have enabled the asynchronous logging with C5.

Wednesday, February 10, 2016

MSF4J :WSO2 Microservices Framework for Java to be Unleashed

WSO2 MSF4J Quick Start Guide

WSO2 recently started implementing a Micro Services Server and finally it will be available as a Micro Services Framework 4 Java. In this post we are going to learn and understand how fast you can write a Micro service in a couple of steps.

So lets get start then.
Prerequisites.
1. JDK 1.8
2. Maven 3.2.0 or above
  1. Clone the git repository and you have to build it, since it's not still released.
git clone https://github.com/wso2/msf4j.git

    2. Create the project using the archetype

mvn archetype:generate 
-DarchetypeGroupId=org.wso2.msf4j 
-DarchetypeArtifactId=msf4j-microservice 
-DarchetypeVersion=1.0.0-SNAPSHOT 
-DgroupId=org.wso2.carbon -DartifactId=Hello-Service 
-Dversion=1.0-SNAPSHOT 
-Dpackage=org.wso2.carbon 
-DserviceClass=HelloService

    3. Open the project using your IDE. and change the HelloService.java as follows. We only implement the GET here.

package org.wso2.carbon;

import javax.ws.rs.GET;
import javax.ws.rs.Path;
import javax.ws.rs.PathParam;
import javax.ws.rs.Produces;

/**
 * This is the Microservice resource class.
 * See <a href="https://github.com/wso2/msf4j#getting-started">https://github.com/wso2/msf4j#getting-started</a>
 * for the usage of annotations.
 *
 * @since 1.0-SNAPSHOT
 */
@Path("/service")
public class HelloService {

    @GET
    @Path("/{name}")
    @Produces({"application/json", "text/xml"})
    public String get(@PathParam("name")String name) {
        return "Hello " + name;
    }
}

    4. Run the program from your IDE. if it's successfully started you'll get a similar log.

2016-02-10 21:52:01 INFO  MicroservicesRegistry:76 - Added microservice: org.wso2.carbon.HelloService@6aa8ceb6
2016-02-10 21:52:01 INFO  NettyListener:56 - Starting Netty Http Transport Listener
2016-02-10 21:52:01 INFO  NettyListener:80 - Netty Listener starting on port 8080
2016-02-10 21:52:01 INFO  MicroservicesRunner:122 - Microservices server started in 197ms

    5. Now lets invoke the service using curl command to test it..

curl -v -X GET http://localhost:8080/service/Aruna
* Hostname was NOT found in DNS cache
*   Trying 127.0.0.1...
* Connected to localhost (127.0.0.1) port 8080 (#0)
> GET /service/aruna HTTP/1.1
> User-Agent: curl/7.35.0
> Host: localhost:8080
> Accept: */*
> 
< HTTP/1.1 200 OK
< Content-Type: application/json
< Content-Length: 13
< Connection: keep-alive
< 
* Connection #0 to host localhost left intact
"Hello Aruna"

So that's it folks, you have implemented your first micro service and just invoked it!!!

So if you are interested, please checkout our git documentation for more features, performance comparisons. And if you have any questions don't forget to drop a mail to dev@wso2.org or architecture@wso2.org

See you soon with another interesting blog post... :)

Monday, December 21, 2015

WSO2 Carbon Kernel 5.0.0 - Released !!!

We are pleased to announce the release of WSO2 Carbon Kernel 5.0.0. It is now available to download from here. The source and tag location for this release are available here.

WSO2 Carbon Kernel 5.0.0 is the core of the next-generation WSO2 Carbon platform. We have completely rearchitected Carbon Kernel from the ground up with the latest technologies and patterns. Additionally, the Carbon Kernel is now a lightweight, general-purpose OSGi runtime specializing in hosting servers, providing key functionality for server developers. The result is a streamlined and even more powerful middleware platform than ever before.
This release of the WSO2 Carbon Kernel includes the following key features. For further details please see the documentation.

Key Features
  •     Transport Management Framework
  •     Logging Framework with Log4j 2.0 as the Backend
  •     Carbon Startup Order Resolver
  •     Dropins Support for OSGi Ready Bundles
  •     Jar to Bundle Conversion Tool
  •     Artifact Deployment Engine
  •     Pluggable Runtime Support

Fixed Issues :  WSO2 Carbon Kernel 5.0.0 - Fixed Issues
Known Issues : WSO2 Carbon Kernel 5.0.0 - Known Issues

How To Contribute

You can find more instructions on how to contribute on our documentation site.

If you have any suggestions or are interested in Carbon Kernel 5.0.0 discussions, you can join the dev@wso2.org or architecture@wso2.org mailing lists.
Reporting Issues

We encourage you to report issues, documentation errors regarding WSO2 Carbon Kernel 5.0.0 through the public issue tracking system.

Thanks,

WSO2 Carbon Team

Saturday, October 17, 2015

WSO2 Carbon Kernel 5.0.0 - Milestone 05 Released!


We are pleased to inform you the 5th milestone release of Carbon Kernel 5.0.0 is now available to download from here. Source and Tag Location for this release is available here.

Carbon 5 [C5] is the next generation of WSO2 Carbon platform. The existing Carbon platform has served as a modular middleware platform for more than 5 years now. We've built many different products, solutions based on this platform. All the previous major releases of Carbon were sharing the same high level architecture, even though we've changed certain things time to time.

Base architecture of the Carbon is modeled using the Apache Axis2's kernel architecture. Apache Axis2 is Web service engine. But it also has introduced a rich extensible server framework with a configuration and runtime model, deployment engine and a implementation, etc. We extended this architecture and built a OSGI based modular server development framework called Carbon Kernel. It is tightly coupled with Apache Axis2. But now Apache Axis2 is becoming a dead project. We don't see enough active development on the trunk. Therefore we thought of getting rid of this tight coupling to Apache Axis2.

Carbon kernel has gained weight over the time. There are many unwanted modules there. When there are more modules, the rate of patching or the rate of doing patch releases increases. This is why we had to release many patch releases of Carbon kernel in the past. This can become a maintenance nightmare for developers as well as for the users. We need to minimize Carbon kernel releases.

The other reason for C5 is to make Carbon kernel a general purpose OSGi runtime, specialized in hosting servers. We will implement the bare minimal features required for server developers in the Carbon kernel.

Our primary goal of C5 is to re-architect the Carbon platform from the ground up with the latest technologies and patterns to overcome the existing architectural limitations as well as to get rid of the dependencies to the legacy technologies like Apache Axis2. We need to build a next generation middleware platform that will last for the next 10 years.

This milestone release is a step towards building an OSGi based server development framework. It includes following new features.

New Features
  • Pax Exam OSGi Test Framework Support
  • Logging framework backend upgraded to log4j 2.0 support
Key Features
  • Pluggable runtimes framework
  • Artifact deployment engine
  • Centralized logging back-end
  • Carbon launcher framework
  • Transport Management Framework
  • Java 8 Support

Documentation

Fixed Issues

How To Contribute

You can find more instructions on how to contribute on our documentation site.
If you have any suggestions or interested in C5 discussions, please do so via dev@wso2.org or architecture@wso2.org mailing lists .

Reporting Issues

Carbon Kernel development is at it's early stages, We encourage you to report issues, documentation faults that you come across and feature requests 
regarding this milestone release of WSO2 C5 through the public issue tracking system.


Thanks,
WSO2 Carbon Team

Thursday, October 15, 2015

OSGi Unit Test Framework for Carbon 5


Introduction
In the current carbon kernel there is no way to write test cases in order to test the OSGi services and functions. This is purely because of the bundles needs to be installed and run on a OSGi  container. Pax- Exam [1] framework provides the underneath infrastructure to compose unit test cases which needs to be run.

How Pax-Exam Works
Pax exam starts up the OSGi framework, (which is equinox for the carbon kernel), with minimum level of bundles which is necessary for the pax-exam operations. Then the Pax Exam user can provision their bundles to the OSGi container. Refer [2] for the provisioned bundles list [2]. This way when the Pax-Exam boots up these provisioned bundles will be installed to the container

How to write Unit test case

Now the Pax-Exam have booted up the OSGi framework with the necessary bundles for your test environment. You have to use the  @RunWith(PaxExam.class) annotation to hook Pax Exam into Testng and let it do its magic of setting up a test container with an OSGi framework and your bundles to run the tests.

[3] is a sample test case added. In the sample you can see that it is very similar to a normal testng test case and containing some annotations which relates to pax-exam.

Using Dependency Injection your test method can access the BundleContext of the probe bundle or any service obtained from the OSGi service registry.

    @Inject
    private BundleContext bundleContext;


or else you can directly access the OSGi services using the following

    @Inject
    private SomeSampleOsgiService service;


If you need any special bundles other than defined in [2], you can always override the config method in your test case class. But make sure that testng bundle must be installed.

@Configuration
    public Option[] config() {
        return options(
mavenBundle().artifactId("testng").groupId("org.testng").versionAsInProject(),
            mavenBundle("sample", "org.wso2.carbon", "1.0.0-SNAPSHOT")
            );
    }

[1].https://ops4j1.jira.com/wiki/display/PAXEXAM4/Getting+Started+with+OSGi+Tests
[2].https://github.com/wso2/carbon4-kernel/blob/c5-pax-exam-work/tests/osgi-tests/src/test/java/org/wso2/carbon/osgi/config/CarbonOSGiConfiguration.java


 1
 2
 3
 4
 5
 6
 7
 8
 9
10
11
12
13
14
15
16
17
18
19
20
21
22
23
24
25
26
27
28
29
30
31
32
33
34
35
36
37
38
39
40
41
42
43
44
45
46
47
48
49
50
51
52
53
54
55
56
57
58
/*
 * Copyright 2015 WSO2, Inc. http://www.wso2.org
 *
 * Licensed under the Apache License, Version 2.0 (the "License");
 * you may not use this file except in compliance with the License.
 * You may obtain a copy of the License at
 *
 * http://www.apache.org/licenses/LICENSE-2.0
 *
 * Unless required by applicable law or agreed to in writing, software
 * distributed under the License is distributed on an "AS IS" BASIS,
 * WITHOUT WARRANTIES OR CONDITIONS OF ANY KIND, either express or implied.
 * See the License for the specific language governing permissions and
 * limitations under the License.
 */

package org.wso2.carbon.osgi;

import org.ops4j.pax.exam.spi.reactors.ExamReactorStrategy;
import org.ops4j.pax.exam.spi.reactors.PerClass;
import org.ops4j.pax.exam.testng.listener.PaxExam;
import org.osgi.framework.Bundle;
import org.osgi.framework.BundleContext;
import org.testng.Assert;
import org.testng.annotations.Listeners;
import org.testng.annotations.Test;

import javax.inject.Inject;

/**
 * Base OSGi class to test the OSGi status of the org.wso2.carbon.core bundle
 */
@Listeners(PaxExam.class)
@ExamReactorStrategy(PerClass.class)
public class BaseOSGiTest {

    @Inject
    private BundleContext bundleContext;

    @Test
    public void testBundleContextStatus() {
        Assert.assertNotNull(bundleContext, "Bundle Context is null");
    }

    @Test
    public void testCarbonCoreBundleStatus() {

        Bundle coreBundle = null;
        for (Bundle bundle : bundleContext.getBundles()) {
            if (bundle.getSymbolicName().equals("org.wso2.carbon.core")) {
                coreBundle = bundle;
                break;
            }
        }
        Assert.assertNotNull(coreBundle, "Carbon Core bundle not found");
        Assert.assertEquals(coreBundle.getState(), Bundle.ACTIVE, "Carbon Core Bundle is not activated");
    }
}


Tuesday, August 11, 2015

[WSO2] Adding tenants using Admin Services - Sample Code

Adding tenants using admin services is straight forward. You have to use two admin services.

1. AuthenticationAdminService
2. TenantMgtAdminService

The  AuthenticationAdminService is used to authenticate the user and get the session. Below is a sample code for adding a tenant

 1
 2
 3
 4
 5
 6
 7
 8
 9
10
11
12
13
14
15
16
17
18
19
20
21
22
23
24
25
26
27
28
29
30
public class TenantMgtAdmin {
    private static final String AS_URL = "https://localhost:9443/services/";

    public static void addTenant(String cookie) throws Exception {

        TenantMgtAdminServiceStub tenantMgtStub = null;
        String tenantMgtEndpoint = AS_URL + "TenantMgtAdminService";

        tenantMgtStub = new TenantMgtAdminServiceStub(tenantMgtEndpoint);
        Options option = tenantMgtStub._getServiceClient().getOptions();
        option.setManageSession(true);
        option.setProperty(org.apache.axis2.transport.http.HTTPConstants.COOKIE_STRING, cookie);

        String value = tenantMgtStub.addTenant(getTenantBean());

        System.out.println("Returned Value ::" + value);
    }

    private static TenantInfoBean getTenantBean() {

        TenantInfoBean bean = new TenantInfoBean();
        bean.setActive(true);
        bean.setAdmin("sample");
        bean.setAdminPassword("sample");
        bean.setEmail("sample@sample.com");
        bean.setFirstname("FirstName");
        bean.setLastname("LastName");
        bean.setTenantDomain("sample.com");
        return bean;
    }

The github url for the project. https://github.com/arunasujith/tenant-sample

Tuesday, December 23, 2014

Adding a custom proxy path for WSO2 Carbon 4.3.0 Based Products

The objective of this article is to give a comprehensive guide on, custom proxy paths, why we need a custom proxy path and how to enable a custom proxy path for WSO2 products. This feature was introduced in Carbon 4.3.0 release.

Custom proxy paths

Custom proxy path is used when mapping a proxy url pattern into a back-end url pattern.
For example lets consider

Proxy entry url path :             https://wso2.com/ProxyContextPath/products
Back-end service url path :         https://wso2.com/products

In the above example “ProxyContextPath” is the proxy context that was added for the target service url. When a client sends a request to the proxy entry url path, the request has to be directed to the back-end service url where the original service lies; and finally the client has to be served via the requested proxy entry url path. The mapping between the proxy url path and the back-end service url path can be resolved fronting the service to a reverse proxy server.

Why we need a custom proxy path?

In the current WSO2 server implementations web context root can be used to change the context root of the management console. The limitation of using the web context root is that it can't be used to change the context root of services.

Proxy context path is a useful parameter to add a proxy path when a Carbon server is fronted by reverse proxy. In addition to the proxy host and proxy port this parameter allows you add a path component to external URLs. e.g.
        URL of the Carbon server -> https://10.100.1.1:9443/carbon
        URL of the reverse proxy -> https://prod.abc.com/appserver/carbon

This specially required whenever you are generating URLs to displace in     Carbon UI components. When hosting multiple wso2 products under the same domain name, the normal scenario is to host them under sub domains.

For e.g. If we have API Manager, ESB and Application Server, the urls would be

https://apim.wso2test.com
https://esb.wso2test.com
https://as.wso2test.com

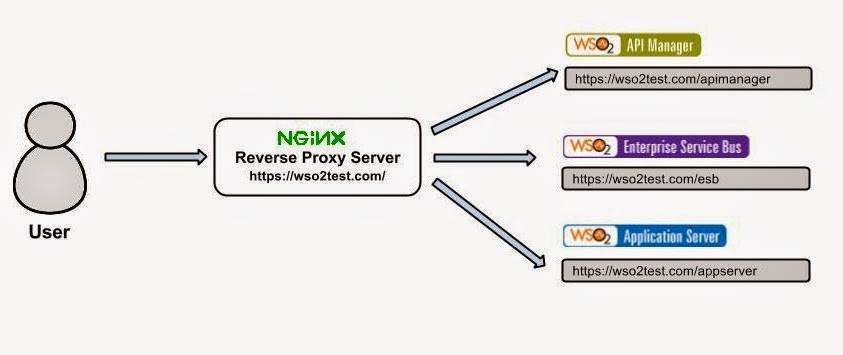
Also this feature would enable customers to expose several WSO2 products under the same domain name. Following diagram describes this concept.

All the products are under a single domain https://wso2test.com and in the example the products lies on proxy paths

API Manager           ---->      https://wso2test.com/apimanager
Enterprise Service Bus ---->  https://wso2test.com/esb
Application Server       ---->  https://wso2test.com/appserver

Configure WSO2 Application Server to add a proxy context path


In this article adding and configuring proxy context path for WSO2 Application Server 5.2.1 is discussed. Before configuring the Application Server, a reverse proxy server need to be installed and configured. For this article we are going to use the nginx reverse proxy server[1].

First install the nginx server and configured in your deployment server machine.

sudo apt-get install nginx

Then create a folder called ssl inside /etc/nginx and lets create the ssl certificates inside this folder.

sudo mkdir /etc/nginx/ssl
cd /etc/nginx/ssl

Then create the server key and certificates.

First create the private key. A pass phrase is prompt when creating the private key.

sudo openssl genrsa -des3 -out server.key 1024

Next create the certificate signing request

sudo openssl req -new -key server.key -out server.csr

Fill in the required details. Most important entry is the Common Name. Enter the domain name or the ip address if there is no domain name.

Next step is to sign the SSL certificate created. Use the following command to sign.

sudo openssl x509 -req -days 365 -in server.csr -signkey server.key -out server.crt

Now creating the certificate is completed and the last step is to setup the virtual host to display the new certificate.

Create a copy of the default sites-enabled configuration

sudo cp /etc/nginx/sites-available/default /etc/nginx/sites-available/wso2

Now create a symbolic between the sites-enabled directory and sites-available directory.

sudo ln -s /etc/nginx/sites-available/wso2 /etc/nginx/sites-enabled/wso2

Now the host is activated, and open up the /etc/nginx/sites-enabled/wso2 and enter the following configurations.

server {
listen 8243;
    server_name wso2test.com;
    client_max_body_size 100M;

    root /usr/share/nginx/www;
    index index.html index.htm;

    ssl on;
    ssl_certificate /etc/nginx/ssl/server.crt;
    ssl_certificate_key /etc/nginx/ssl/server.key;

    location /appserver/ {
        proxy_pass https://as.wso2test.com:9443/;
    proxy_redirect https://as.wso2test.com:8243/ https://wso2test.com:8243/appserver/;
    }

}

server{
    listen 8280;
    server_name wso2test.com;
    client_max_body_size 100M;

    root /usr/share/nginx/www;
    index index.html index.htm;


    location /appserver/ {
        proxy_pass http://as.wso2test.com:9763/;
        proxy_redirect http://as.wso2test.com:8280/ http://wso2test.com:8280/appserver/;
    }
}

In the nginx configuration for https requests with the /appserver/* pattern, the requests are directed to the /* pattern and the when the service is served to the client it resolves the url pattern to /appserver/*. This is same for the http requests also.

Save the file and Restart the nginx server using the following command and that's done with the nginx configurations.

    sudo service nginx restart

In the configuration https , http requests are listening on the 8243 and 8280 respectively. Server Name is set to wso2test.com. To test in a local machine you need to put the wso2test.com , as.wso2.com into the /etc/hosts entry as follows.

    127.0.0.1        wso2test.com   
    127.0.0.1        as.wso2test.com

Then lets configure the WSO2 Application Server 5.2.1. First Download the product and extract it to your machine. Lets consider WSO2AS-Home as the extracted directory.

Open the /repository/conf/carbon.xml and do the following configuration changes.

Set HostName as the hostname defined in the nginx configuration.

    wso2test.com

Set the MgtHostName as as.wso2.com

    as.wso2test.com

Set the ProxyContextPath as the appserver. This is the proxy path string which will appear in the management console, web apps and services urls.

    appserver

As mentioned in nginx configuration section the https, http requests are listening on the 8243 and 8280; but by default WSO2 products are listening on the 9443 and 9763. In this particular article 8243 and 8280 configured as the proxy ports. Whenever the incoming requests are coming through the 8243 and 8240 they are proxied to the 9443 and 9763 ports.

To enable proxy ports open the /repository/conf/tomcat/catalina-server.xml file and add the following two entries.


proxyport.png 

proxyPort Configuration in catalina-server.xml file

That's all for the configuration. Now start the server and enter the following url in a browser.

https://wso2test.com:8243/appserver/carbon/

You'll redirect to the login page, give the admin credentials and log into the server. You'll find the proxy path for admin console, services, webapps changed to the “/appserver” proxy path.


console.png 

Conclusion


Proxy context path is useful when a wso2 server fronted by a reverse proxy server. You can add a proxy context path along with a proxy host and a proxy port parameter. This enables UI url paths to be display in a proxy path and by enabling this proxy path, multiple products can live under a single hostname.


References


[1].http://nginx.org/
[2].https://www.digitalocean.com/community/tutorials/how-to-create-a-ssl-certificate-on-nginx-for-ubuntu-12-04

Wednesday, November 5, 2014

[WSO2] Sample Web Application to Demonstrate Insertion, Retrieval and Deletion of a resource to Registry

Here is a sample web application to test Insertion, Retrieval and Deletion of a  resource to Registry.
Here is the sample servlet code. Github Link

package org.wso2.carbon.test;
import java.io.IOException;
import java.io.PrintWriter;
import javax.servlet.ServletException;
import javax.servlet.annotation.WebServlet;
import javax.servlet.http.HttpServlet;
import javax.servlet.http.HttpServletRequest;
import javax.servlet.http.HttpServletResponse;
import org.wso2.carbon.context.CarbonContext;
import org.wso2.carbon.context.RegistryType;
import org.wso2.carbon.registry.api.Registry;
import org.wso2.carbon.registry.api.Resource;
/**
 * Servlet implementation class RegistryTest
 */
@WebServlet("/RegistryTest")
public class RegistryTest extends HttpServlet {
    private static final long serialVersionUID = 1L;
    /**
     * Default constructor.
     */
    public RegistryTest() {
        // TODO Auto-generated constructor stub
    }
    protected void processRequest(HttpServletRequest request,
                                  HttpServletResponse response) throws ServletException, IOException {
        try {
            PrintWriter out = response.getWriter();
            System.out.print("URL = " + request.getRequestURL());
            System.out.print(" :: action = " + request.getParameter("action"));
            System.out.print(" :: path = " + request.getParameter("path"));
            System.out.println(" :: resource = "+ request.getParameter("resource"));
            String resourcePath = request.getParameter("path");
            String resourceValue = request.getParameter("resource");
            String action = request.getParameter("action");
            CarbonContext cCtx = CarbonContext.getThreadLocalCarbonContext();
            Registry registry = cCtx.getRegistry(RegistryType.SYSTEM_CONFIGURATION);
            if (resourcePath != null && action != null) {
                if (action.equalsIgnoreCase("add")) {
                    if( resourceValue != null){
                        Resource resource = registry.newResource();
                        resource.setContent(resourceValue);
                        registry.put(resourcePath, resource);
                        out.println("Resource added successfully!!");
                        out.println("Registry path :: " + resourcePath);
                        out.println("Registry value :: " + resourceValue);
                    }else{
                        out.println("ERROR :: Resource Value Empty!!!");
                    }
                } else if (action.equals("get")) {
                    if (registry.resourceExists(resourcePath)) {
                        Resource resource = registry.get(resourcePath);
                        String content = new String((byte[]) resource.getContent());
                        response.addHeader("resource-content", content);
                        out.println("Resource Found in Registry returned!!!");
                        out.println("Registry path :: " + resourcePath);
                        out.println("Registry value :: " + content);
                    } else {
                        out.println("ERROR :: Resource Not Found in Registry!!!");
                        out.println("Registry path :: " + resourcePath);
                    }
                } else if (action.equalsIgnoreCase("delete")) {
                    if (registry.resourceExists(resourcePath)) {
                        Resource resource = registry.get(resourcePath);
                        String content = new String((byte[]) resource.getContent());
                        registry.delete(resourcePath);
                        out.println("Resource Found and deleted!!!");
                        out.println("Registry path :: " + resourcePath);
                        out.println("Registry value :: " + content);
                    } else {
                        out.println("ERROR :: Resource Not Found in Registry!!!");
                        out.println("Registry path :: " + resourcePath);
                    }
                }
            } else {
                out.println("ERROR :: Resource Error!!!");
            }
        } catch (Exception e) {
            e.printStackTrace();
        }
    }
    /**
     * @see HttpServlet#doGet(HttpServletRequest request, HttpServletResponse
     * response)
     */
    protected void doGet(HttpServletRequest request,
                         HttpServletResponse response) throws ServletException, IOException {
        processRequest(request, response);
    }
    /**
     * @see HttpServlet#doPost(HttpServletRequest request, HttpServletResponse
     * response)
     */
    protected void doPost(HttpServletRequest request,
                          HttpServletResponse response) throws ServletException, IOException {
        processRequest(request, response);
    }
}

To test the application host it to WSO2 Application Server. Execute the following commands.

Adding resource

curl --data "action=add&path=&resource=" -v http://localhost:9763/CarbonTest-1.0.0/RegistryTest
e.g

curl --data "action=add&amp;path=/foo/bar&amp;resource=AAAAAAAAA" -v http://localhost:9763/CarbonTest-1.0.0/RegistryTest<br />

Getting resource

curl --data "action=get&amp;path=" -v http://localhost:9763/CarbonTest-1.0.0/RegistryTest
e.g
curl --data "action=get&amp;path=/foo/bar" -v http://localhost:9763/CarbonTest-1.0.0/RegistryTest<br />

Deleting resource

curl --data "action=delete&amp;path=" -v http://localhost:9763/CarbonTest-1.0.0/RegistryTest
e.g

curl --data "action=delete&amp;path=/foo/bar" -v http://localhost:9763/CarbonTest-1.0.0/RegistryTest<br />

Monday, November 3, 2014

Create a WSO2 Worker-Manager Cluster in Just 2 Minutes !

I've been working on an application(WSO2 Cluster Wizard) which creates a Worker-Manager Separated cluster for a given WSO2 Product. The objective of this application is to reduce the time spent on creating clusters in developers/testing local machines. Though puppet scripts can automate the process AFAIK, no one uses puppets to create clusters in their local setups'. 
This is a simple GUI application which is very easy to use. Here is a screen shot of the UI.
 
 Basic Functionality.
  1. Creates Worker-Manager separated cluster (WKA based)
  2. Choice of enabling registry mounting
  3. Works on almost every WSO2 product
  4. Works on both Windows and Linux environments 
How to use 
Run the application using java -jar ClusterWizard.jar
  1. Select the zip file of product you want to cluster
  2. Select the destination folder
  3. Fill out the Manager and Worker settings
  4. If registry mounting enabled fill out the mysql connection details
  5. Hit execute button.
Hope this will be useful, and highly appreciate your feedback. :)
In the next version I'll be hoping to add the WSO2ELB configuration support also.
Source can be found at. Github Link